Friday, December 3, 2010

With the Band vintage skirt refashion

with the band skirt after 1
This skirt has quite the story... I saw it in the window of Modern Millie, the amazing vintage / consignment shop in town, and couldn't stop thinking about it. I stopped by the shop a few days later and it was still there! I knew I had to have it.

with the band skirt before 1
Except... there were problems. The salesgirl warned me, as she was taking it off the mannequin, that the waist was small. Really small. Like, 18" of small. So small, in fact, that she couldn't take it off the mannequin's hips and had to fight to get it off over her shoulders. Ummm... a problem, for sure, but how fantastic is that print?!? "It needs some love," the salesgirl said, and I knew I was the one to give it, so I bought it.

with the band skirt before 3
When I got it home, I did some investigation, and here's what I've figured out:
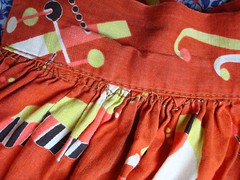
  • This skirt is homemade (see gathering stitches showing under the waistband)
with the band skirt before hem
  • This skirt was probably for a child (see tiny waist, and hem that was let down twice)
with the band skirt selvage 2
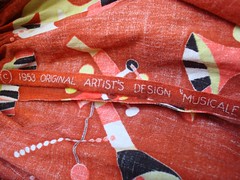
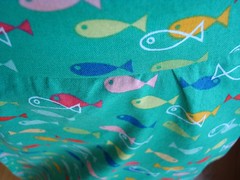
  • This skirt is old: selvage was still attached, and the fabric design is copyright 1953!

Thankfully, the skirt was also long enough that I could make the necessary alterations. Here's what I did:
  • Used my seam-ripper to remove the existing waistband
  • Carefully un-gathered skirt
with the band skirt ungathered
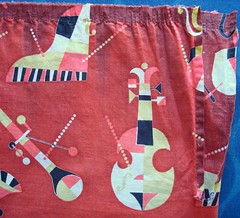
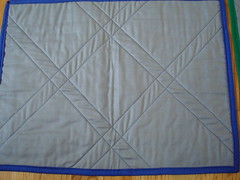
  • Pressed the heck out of it (check out the fading!)
  • Cut 3" off the top of the skirt
  • Cut a slit down the center back to remove the hole and insert a zipper
with the band skirt after zip
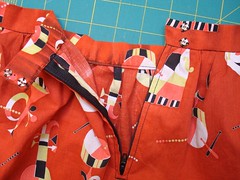
  • Sewed a seam in the center back and inserted a zipper
  • Re-gathered the skirt to fit my waist
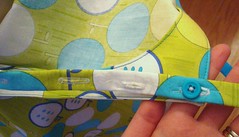
  • Fashioned a 1" waistband from the 3" I cut off the top
  • Attached waistband to re-gathered skirt and added a snap closure

with the band skirt after 4
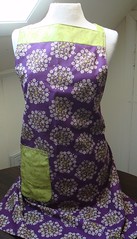
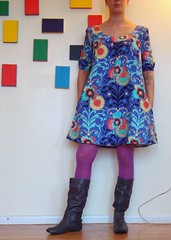
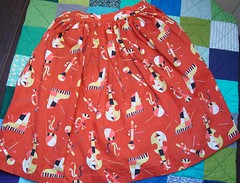
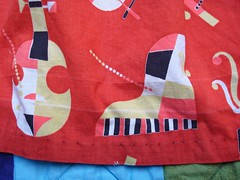
And here is the finished skirt! It really wasn't that much work to fix it, and the new length hits a few inches above my knees, which is perfect! Also, because the skirt is made of two lengths of fabric sewn selvage to selvage (there are two sets of selvages--one at each side seam), there's still a lot of volume. And that print! Oh my--I am in love!

Wednesday, December 1, 2010

Commission crafting

JJ scotty dog 2
Well, I'd been hoping to get this post up in November, but... The holidays are here! That means 'tis the season to craft like a maniac but not be able to reveal what's been crafted! So, maybe it *is* a good thing that I'm behind on blogging my projects... These were all made for friends by their requests. Above are a mini lap quilt (about 31" x 40" finished) and a Scottie dog made for my friend JJ's parents. The lap quilt was just pieced from pre-cut squares from Connecting Threads. It's put together the "cheater" way, with no binding. There is a layer of batting and the backing is a cozy flannel.

JJ scotty dog 3
The Scottie dog is another attempt at this pattern. I really like how stately this guy looks with his little neck bow!

Sandy apron 2
This apron was a request by another friend and is an improvised pattern from me. I now wish I'd made it a little smaller in the bib top and in the drop to the hips/ties, but it's an apron, right?!? Too big is okay, and I realize I'm on the petite size of average (read: shorty) so just because I had to gather it up at the tie doesn't mean everyone will have to!

Back to my elf-cave of holiday crafting, but more soon!

Wednesday, November 24, 2010

Fishy skirt

fish skirt 3

Here's another go at the skirt pattern I drafted over the summer. This skirt is almost exactly the same as the original (which is one of my favorite skirts to wear!); I used a pants clasp closure instead of a button on the waistband, but that's the only difference. I want to (again) plug Cal Patch's book, which is awesome and you should definitely own if you're interested in pattern drafting, or even just in making your own clothes that fit right the first time.

fish skirt fabric detail

I really loved this fishy fabric when I first saw it (in January or February, I think) and bought a few yards to make a full skirt, so this is me finally getting around to it! I still want to do some hand-stitching with a thicker thread around the pockets and maybe the hem; pictures TK, if I actually get to it!

As a side note, I'd like to wish you a very happy Thanksgiving if you're reading this! It'll be all sides and Quorn Turk'y Roast for us this year, as it has been for many previous years. Thanksgiving tastes SO much better when it's cruelty-free!

Monday, November 15, 2010

Comfiest dress ever

Love flannel dress 3
Seriously. I am in love with this dress, and I've only been able to wear it twice. So far. It's currently in the wash, which I need to do so I can wear it again this week! It really is so comfy, cozy, and really really awesome--might I say my best apparel-sewing to date?

Love flannel dress 1
This is take 2 of my Kathy dress pattern from Cal Patch's amazing Design-It-Yourself Clothes: Patternmaking Simplified and I like it even more than take 1, which is saying something! The first thing I did before making this dress was re-draft the shoulder / armhole area. I ended up narrowing the shoulder significantly so that now it fits really well and isn't sagging or baggy. I also re-drafted the armhole to be less deep. The seam here is still a little wonky and could use some more work, but it's a definite improvement!

Love flannel dress back 1
Here's the back. I meant for the sleeves to go to a few inches below the elbow with the elastic in the cuff, but once I hemmed them and made the casing, they came out a little too short, so I need to wear them above the elbow (which is fine--hello, tattoo!) This time I cut the pockets into the correct side of the dress, too!

Love flannel dress neckline
The fabric is flannel, from Amy Butler's Love line, and it's the most gorgeous shade of periwinkle; I just love it. The dress has the potential to be really warm, so this deep scoop neck in the front and back is really essential.

Saturday, November 13, 2010

Housewarming / engagement gifts

4 placemats 1

A bit of news: I'm getting a sister! Well, a sister-in-law, but still! I only have one brother, so I'm very excited that he is getting married! I was in Cincinnati a few weeks ago, visiting with the newly engaged couple--who had also just moved in together--and I wanted to bring them a little handmade as a congrats. The first things I made were these placemats from Dare to Be Square Quilting. (An aside - this book is really really cool and I'm surprised I haven't seen it out in blogland more!)


4 placemats back detail

The patchwork is simple, and the quilting is perfect--I did mine in a dark blue cotton thread that added just the right bit of contrast. And it looked cool on the back, too! This was my first attempt at this method of machine binding, and I must say that it turned out pretty well and definitely saved me a lot of time hand-stitching, though did take a bit of time at the ironing board making the non-bias binding tape.


zigzag apron

The next thing I made was another zigzag apron, from Stitch magazine a couple of years ago. I forget that this is kind of a fussy pattern, with a lot of pieces, and facings, and interfacing, and miles and miles of handmade bias tape... Still, I'm so pleased with the finished product that it's worth it.


zigzag apron button band

I made this one adjustable at the neck with a button closure, just in case my brother wants to wear it. Of course, he put it on right away and it's WAY too small for him, but I must admit that the skirty bottom sure looked cute!

Thursday, November 11, 2010

Misc crafting

plastic bag dispenser

More catch-up! Here are some little bits I stitched up last month. The first is a plastic bag dispenser, which we didn't know we needed! The pattern is from Stitch magazine a few issues back, and the bag holder hangs on the wall near the litter box. Genius! There's something about those patchwork squares with the diagonal-line quilting through them that just warms my heart...

quilt with wrap 2

The second bit is a little of an after thought. I'd been meaning to make these removable bands to secure baby quilts for the show that killed my mojo but ran out of time. Now: done! It's a very simple little design, but one that I hope is helpful for parents trying to juggle a million and one baby supplies.


And, sort of related, this lovely post from my reader yesterday goes a long way in summing up how I feel about sewing. Thank you, Mom, Thank you, Gramma, for teaching me to sew. I love you.

Tuesday, November 2, 2010

Gifted: Birthday

Sadie bday gifts
How is it November already?! I feel like I'm so behind in blogging my fall crafting, and now it's time to start kicking things in gear for Christmas crafting... Oh my! Pictured above is the birthday present I sent to my friend Sadie about a month ago. I wasn't sure what to make for her, but I've been thinking for a while about coming up with my own zippered bag pattern, which is what you see above. I also included a set of my cards, left over from the craft show fail from September.

zippered pouch 1
I think the pouch pattern still needs a little bit of work, but in all I'm pleased with how it came together. I like the look of linen + patchwork, and I also like the durability it offers, too. I also really like covered ends on zippers. It's a little thing, to be sure, but makes quite a bit of difference--and also stretches those 7" standard zippers just a little bit further, which I like. The ribbon on the zipper pull is just the finishing touch!

Tuesday, October 19, 2010

Tethered Threads: September + October

Sept blocks
Playing a little catch-up with the blogging of these blocks for my block party... Above are the blocks for September; Jen wanted more drunk-love-in-a-log-cabin blocks, but using Anna Maria Horner's Good Folks line. Many many props to her for cutting into her stash! I really love these blocks, and the colors in this line in general, and I'm sure the finished quilt will be spectacular!

October blocks
Next are October's blocks. These are for Amanda's son, due to arrive in a couple of months. I was so inspired by these fabrics and the colors that I dove in right away! Amanda wanted us to mostly use the solids, with the prints as accents. I love how these blocks turned out, but I do worry that I used too much of the prints, especially that stripey one. I just loved it so much, it was hard to stay away! Almost done with the bee--wow! Where does the time go? And when am I actually going to finish putting together my quilt?!

Monday, October 18, 2010

Gifted: Tiny bird + nest

tiny bird 1
One thing that I've noticed post–craft show is that I'm really enjoying being able to craft what and when I want to. Of course, there are still deadlines for gifts, but I'm enjoying the variety and slower pace of crafting compared to those frenzied weeks right before the show. I guess that's one good thing that comes from failure...

tiny bird w nest 2
A friend of mine just had a birthday, and as soon as I got the book Little Birds, I knew I had to make this project for her. (Side note: How great are these new little Stash books? What a lovely concept! I'm looking forward to more in this series.) So, back to the bird, which is TINY! Seriously--it's very very small. The eye? That's a black seed bead! The nest? That's about the size of a baseball!

tiny bird in nest 4
I thoroughly enjoyed making this little guy. I followed the directions really closely, only veering a few times. I don't know how to knit in the round and didn't want to try to learn, so I crocheted the nest instead, just as I would start a hat. I used wool-blend felt for the bird, accented with some little scraps of voile left over from this quilt. I also tore the voile into strips and used that for the nest. I love the way it all looks together!

Monday, October 11, 2010

Craft show: FAIL

craft booth 1
As I indicated in my last post, I did all of this work for naught. I'm not sure what it was that made people not buy my wares. In some ways, it was a perfect storm of no-sales: the weather was a gorgeous 81*, which kept people from thinking "fall! scarves! quilts!" and also sent a number of potential customers to the beach. We didn't have the best booth placement, but there weren't that many booths there, so I'm sure all interested parties made their way around to our space.

us at craft booth
I ended up selling my scarves for $30 and my mini-quilts for $45 / $60 for the all-flannel ones. I sold two quilts and something like four scarves--all to people I knew! Seriously, why did I pay a booth fee to sell to co-workers or friends I see every week? It was a bit ridiculous. Hilary had an equally poor showing, and she usually makes a killing selling her sock critters, so we really have no idea why we got so few bites. Maybe we were just too funky for our own good?

craft booth sign
I mean, seriously. How adorable is that sign?! We are not giving up--we're definitely exploring other avenues, but the deadlines for holiday shows passed long ago, so we may have to sit on our inventory for a while. Lovely.

So, could I interest you in some handmades??

Friday, October 1, 2010

Tethered Threads: August

Marty blocks 1
(Yes, I know that it is now October!) Above are the blocks I made for Marty for August's block party assignment. The colors just did not photograph well for me--late night pictures. I hate that the sun is setting so early again! Marty gave us each mostly the same fabrics, with one different one for each of us, which she asked us to use in both blocks (mine is the red). I'm fairly pleased with these, though I wish they were more interesting. Still, I'm not sure what I would change, so guess that's a good thing?

In other block party news, I think I had a breakthrough on my block party quilt, which you may remember I wasn't loving. Two words: set diagonally. With sashing. I think that might be the trick! If I feel adventurous this weekend, I may play around. Lord knows I don't have to worry about this fiasco any more... More on that next week (it didn't go well).

Monday, September 20, 2010

Where have I been?

piles of craft
I have pretty much spent the entire month of September chained to my sewing machine, churning out crafts for my first real craft fair--this Saturday! Above is a picture of the piles of stuff I have (almost) done.

scarf rack 2
Here are some of the 12 quilted scarves I have finished. These are patchworked onto batting, backed with cozy flannel, and topstitched. I've had my own since last winter and I love it! So warm and comfy! Scarves finish around 6-1/2" x 60"--plenty long to wrap around your neck once or twice.

all minis
These are the mini-quilts I have completed--plus some I have nearly completed. As of this writing, I have 5 of the 13 of them completely done. Those that aren't finished just need me to hand-stitch the binding to the backing (easier said than done, though). The quilts all finish around 20" x 30", which is a perfect travel size for baby! They would also make great wall art. Most of them are backed with flannel, too! Soft AND cozy!

FF minis 2
This is just a gratuitous shot of my favorite minis, all using Anna Maria Horner's Folksy Flannels. These were a dream to work with, and are SO soft! Also, they're gorgeous, like all of her stuff!

Pricing is still a little in question for me. I think I have it figured out, but I'd like to pose the question to you, dear reader: If you were to buy one of my scarves, how much would you be willing to pay? Same with the mini-quilts; what do you think they're worth? Would you pay more for the Folksy Flannel ones? I've been pouring ALL of my energy into these for weeks, and I doubt I'll be able to make any kind of profit on them once I factor in my time, but I'm curious to know what other people think. I also think I'm overvaluing my work because I'm having a hard time letting go..

Tuesday, September 14, 2010

New(est) ink!

sewing machine tattoo 3
In my last post, I promised pictures of some "needlework" I had done. Here it is! My newest, most bad-assest tattoo! It's a line drawing of my grandmother's sewing machine, an old Necchi, on my inner left forearm, just below the elbow. I. Love. It!!

sewing machine tattoo before after
Here's a little before-and-after. The photo of the machine is the one I gave to Molly, my tattoo artist (at Witch City Ink, which I would highly recommend!), who drew up the tattoo from there. I love all of the detail she was able to keep--the knobs and levers, even the thread guides and, my favorite, the screw holes on the throat plate!

sewing machine tattoo 7
I got the tattoo in early August so I've had some time to adjust to it already, but I'm continually struck by how awesome it is. I love having this reminder of what I love (both sewing, and my grandmother) right where I can see it. All of the time.

sewing machine tattoo 4
Some people wear their hearts on their sleeves. I wear my sewing machine on my arm.

Saturday, September 11, 2010

Even more baby gifts

James baby gifts 1

I'm back...again...after some more unexpected silence. Gah! Can't keep up! Here is another set of baby gifts, gifted to my coworker James a while ago. His little boy was born just over a week ago and is a real cutie! Can't wait to see pictures of him wearing those little rockin' booties!

James baby gifts 2

Per usual, the elephant pattern is from here and the booties are from here. I am so predictable.
I'm hoping to get my bloggy mojo back soon. I spent way too much time this morning setting up a Google reader of all the links to the right and then catching up on weeks' worth of other people's crafting. Yowza. I still can't show you much of what I've been working on, but I did finish a large commission job (my first! yay!) and am now embarking on another adventure: selling at a craft fair! It's in two weeks. Panic has not yet kicked in, but I need to be massively productive this weekend. So, stay tuned for some in-progress shots, as well as pictures of some, uh, needlework I had done....

Thursday, August 26, 2010

Tethered Threads: July

Beth blocks
Now that August is nearly over, I guess it's time to show the blocks I made for my Tethered Threads block party for July! These are for Beth, who had requested blocks in the style of Denyse Schmidt's Drunk Love in a Log Cabin quilt. This is a really popular block party request, it seems, but I'd never actually made blocks in this style before. Hope I did it right!

Psst! This is my 250th post, according to Blogger! Wow. Perhaps I should do some kind of giveaway at some point? I've got some big projects cooking right now, but maybe something in October??

Thursday, August 19, 2010

Gifted: Wedding-ish quilt

Nick Katie quilt
Wow! I don't know where the time is going, but it seems every time I look I've been neglecting the blog! And yet, even though there's not a TON of crafting going on, I've been amassing pictures on my camera. Nearly 300 of them, from various day and weekend trips, plus a little bit of crafty crafty. I finally downloaded them last night in a marathon session--seriously, we're talking hours here. Phew! Anyway, this is a quilt I made for my lovely friends Nick and Katie. It's only a "wedding-ish" quilt because they were married in May 2009, but in late July had a party/reception/ceremony, which is when I gave them this gift.

Iris on Nick and Katie quilt
The pattern is from this book (you can see the original on the third page here) but I definitely changed it up a bit. For starters, I used a Dill Blossom jelly roll, so I re-drafted the blocks to use the 2.5" strips instead of 2" strips the pattern called for. I eliminated the prairie points and changed the layout to use fewer blocks, but the essence of the quilt is still the same.

Nick Katie quilt back
For the back, I pieced some lovely, super soft Connecting Threads solid teal with some strips and fat quarters of fabric from the front. (By the way, did you see that Connecting Threads has massively expanded their line of solids, and lowered all pricing??)

Nick Katie quilt quilting
For quilting, I divided each block into three sections--a top, middle, and bottom--and quilted loop-de-loops up and down through all of the rows with some gorgeous variegated teal Aurifil thread. I also did some curlicues in the outside borders. (Side note: Gloria is still quilting a-maz-ing-ly! I was so surprised when I was able to quilt this entire twin-sized quilt in little over an hour and a half! Free-motion ftw!)

Nick Katie quilt folded
Bound in the polka-dot, the quilt is folded and ready for gifting! Nick and Katie loved it, of course. Rob and I traveled to Providence, RI to stay with them last weekend and were able to see the quilt in action on their couch and sleep under it for two nights. A lovely quilt for some lovely people! Does it get any better?